Creating Your Own Modern Concrete Planters: In our homes, we seek anchors—objects of substance and permanence that ground us in a fast-paced, digital world. We yearn for things made by hand, infused with intention. And what is more substantial, more permanent, more fundamentally real than stone?
But we are not ancient stonemasons, chipping away at granite. We are modern alchemists. We can create our own stone, command it to take any form we desire, and use it to cradle life itself. This is the art of the concrete planter.
Forget the lumpy, grey garden gnomes of the past. We are talking about something else entirely. We’re exploring the world of modern concrete design: clean lines, bold geometric forms, and the honest, unadorned beauty of the material itself. A modern concrete planter is a piece of minimalist sculpture. It’s a study in the play of light and shadow across a textured surface. It is a quiet, powerful statement piece that elevates a simple houseplant into a living work of art.
This is not a quick weekend project. It is a journey into a craft. It requires patience, precision, and a willingness to get your hands dirty. It is a process of creation, from architectural drawing to chemical reaction to final, tactile object.
This guide is your deep dive. We will not just show you how to make a planter; we will explore why certain forms work, why the mix is so critical, and why the finishing process separates the amateur from the artisan. By the end, you will have the knowledge not just to follow instructions, but to design and execute your own unique concrete creations.
So, clear a space in your workshop, put on your old clothes, and prepare to sculpt with liquid stone.
Part 1: The Modernist’s Muse – Why Concrete? Why Modern?
Before we mix a single batch, let’s understand the aesthetic we are chasing. The appeal of modern concrete design is rooted in the principles of architectural movements like Brutalism and Minimalism.
- Honesty of Material: Concrete doesn’t pretend to be anything else. It is not faux stone or imitation wood. Its beauty lies in its raw, unadorned state. The subtle color variations, the tiny air pockets (bug holes), the texture—these are not flaws; they are the material’s authentic voice.
- Form Follows Function: A planter has a simple job: to hold soil and a plant. Modern design strips away all unnecessary ornamentation, focusing on the purity of the form itself. A perfect cube, a stark cylinder, a low-slung trough—these shapes are powerful in their simplicity.
- The Play of Light and Shadow: The sharp, clean lines of a well-made geometric planter create dramatic shadows that change throughout the day. Your planter is not a static object; it’s a dynamic sculpture that interacts with its environment.
- The Juxtaposition of Textures: There is a profound beauty in the contrast between the hard, cool, industrial nature of concrete and the soft, organic, living vibrancy of a plant. One is permanent and stoic; the other is delicate and ever-changing. Together, they create a perfect harmony.
When you create a modern concrete planter, you are engaging in this rich design tradition. You are not just making a pot; you are making a statement about form, material, and the nature of beauty.
Part 2: The Anatomy of a Perfect Planter – Foundational Principles
Before you even think about building a mold, you must consider the core functional requirements of any good planter. Getting these wrong will lead to a failed project, no matter how beautiful it looks.
1. Drainage is Non-Negotiable
This is the golden rule. Without a hole for excess water to escape, your plant’s roots will sit in stagnant water and rot. Period. Your design must incorporate one or more drainage holes. This is planned for during the mold-making phase.
2. Wall Thickness is Strength
The walls of your planter need to be thick enough to withstand the hydraulic pressure of wet soil and the stress of freeze-thaw cycles if placed outdoors.
- For small to medium planters (up to 12-15 inches): A wall thickness of ¾ inch to 1 inch is a good target.
- For larger planters (18 inches and above): Aim for 1.5 inches or even 2 inches.
Too thin, and the planter will be fragile and prone to cracking. Too thick, and it will be unnecessarily heavy and waste material.
3. Scale and Proportion
Think about where the planter will live and what it will hold. A massive, chunky planter might overwhelm a delicate succulent, while a tall, slender snake plant might look comical in a short, wide bowl. Sketch your ideas. Consider the “rule of thirds”—the plant should generally be about one-and-a-half to two times the height of the visible portion of the planter.
4. The Inner Form (The Void)
The inside of your planter should be slightly tapered, with the bottom being narrower than the top. This gentle slope (called a “draft angle”) makes de-molding the inner part of the mold significantly easier. It also helps when it comes time to re-pot the plant years down the line.
Part 3: The Architect’s Phase – The Art and Science of Mold Making
The mold is the heart of this project. The quality of your mold will directly determine the quality of your final piece. Any imperfection, any tiny gap or scratch, will be faithfully transferred to the concrete. We’ll explore three primary methods, from simple to advanced.
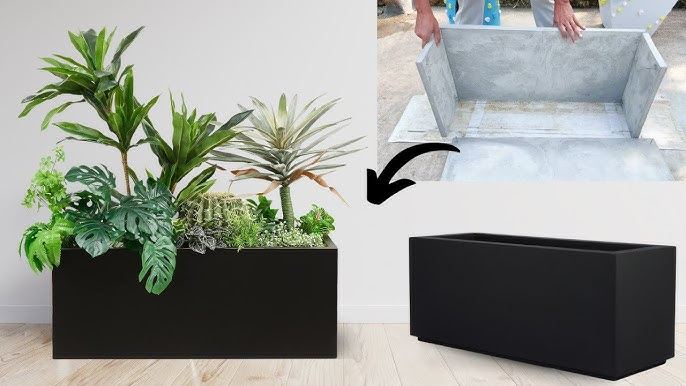
Method 1: The Rigid Box Mold (For Crisp, Geometric Shapes)
This is the classic method for creating planters with sharp lines and flat planes (cubes, rectangles, troughs). It consists of an outer box and an inner box (the “plug”).
- Material of Choice: Melamine-Coated Particleboard
This is the ideal material. Its smooth, non-porous surface gives the concrete a glass-like finish and prevents it from sticking. - Building the Outer Mold:
- Design your planter’s exterior dimensions. Let’s say a 10″x10″x10″ cube.
- Cut your pieces: One 10″x10″ base and four 10″x10″ walls. Use a table saw or track saw for perfectly square cuts.
- Assemble the walls around the edges of the base, not on top of it. Secure them with wood screws every few inches. Pre-drill all holes.
- Building the Inner Mold (The Plug):
- Calculate its dimensions. If our outer mold is 10″x10″ and we want a 1″ wall thickness, the inner mold needs to be 8″x8″ on the outside (1″ wall on each side).
- Incorporate a draft angle. Make the bottom of the plug slightly smaller than the top (e.g., 7.75″x7.75″ at the base, 8″x8″ at the top).
- Assemble the inner box.
- Creating the Drainage Hole: Drill a hole through the base of the outer mold. Take a short piece of dowel or a cork, the diameter of your desired drain hole, and screw or glue it into the hole so it stands up inside the mold. This will create the void.
- The Secret Weapon: Silicone Caulk: Use 100% silicone to caulk every interior seam of both the inner and outer molds. Tool the bead with a fingertip or a caulking tool to create a smooth, small radius. This prevents leaks and gives your planter beautifully soft, professional-looking edges. Let the silicone cure completely.
- Mold Release: Even with melamine, a mold release agent is crucial, especially for the inner plug. You can buy commercial mold release or create your own by mixing 1 part castor oil with 8 parts denatured alcohol in a spray bottle.
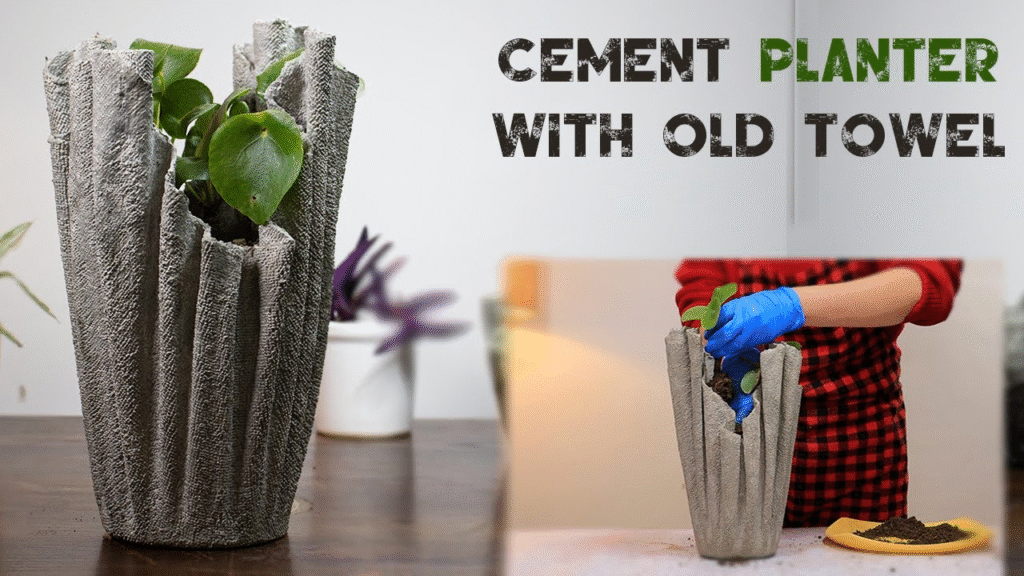
Method 2: The Wabi-Sabi Way (Using Found Objects)
This is the most accessible method and perfect for beginners. It embraces organic shapes and slight imperfections.
- The Concept: Find two nesting containers—one larger, one smaller—that will create your desired wall thickness. Plastic storage bins, food containers, bowls, and buckets are perfect candidates.
- The Process:
- Prepare the “outer” container. If it’s plastic, a light coat of cooking spray or mineral oil will work as a mold release.
- Drill a drainage hole in the bottom of the outer container and plug it from the inside with modeling clay or a piece of dowel.
- Prepare the “inner” container. Coat the outside of it with mold release.
- You will pour the concrete into the outer mold, then press the inner mold into the wet concrete, using something heavy (like rocks or sand) to weigh it down and prevent it from floating up.
Method 3: The Sculptor’s Choice (Silicone Molds)
For complex curves, organic shapes, or creating multiple copies of a unique design, a silicone mold is the ultimate solution. This is an advanced technique.
- The Concept: You first create a “master” or “plug” of your desired planter shape out of clay, wood, or 3D-printed plastic. You then build a containment box around this master and pour two-part liquid silicone over it. Once cured, the silicone forms a flexible, durable, reusable mold.
- Why it’s Superior: Silicone captures incredible surface detail and its flexibility makes de-molding even complex shapes incredibly easy.
- The Trade-off: The materials (two-part silicone) are significantly more expensive than melamine.
Part 4: The Alchemist’s Brew – Perfecting Your Concrete Mix
Do not walk into a hardware store and grab a bag of standard concrete mix. It’s filled with large, coarse gravel and is designed for sidewalks, not for fine casting. You need a specialized mix that is strong, flowable, and has a fine texture.
Option A: The All-in-One Bagged Mix (Highly Recommended for Beginners)
Companies like Quikrete (their 5000 mix is a good starting point), Buddy Rhodes, or SureCrete offer pre-blended casting or countertop mixes. These are engineered with the perfect blend of fine sand, Portland cement, and often include performance-enhancing additives. This is the most reliable way to get consistent, high-quality results.
Option B: Mixing from Scratch (The Artisan’s Path)
This offers ultimate control over color, texture, and performance. A good starting recipe (by volume) is:
- 1 Part Portland Cement (Type I or II): This is the glue. Use fresh, lump-free cement.
- 2.5 to 3 Parts Fine Sand: Use washed, graded sand (sometimes called “play sand” or “mason’s sand”). Sifting it through a screen can remove larger pebbles for an even finer finish.
- Water: The most critical component. The goal is the lowest possible water-to-cement ratio that still provides a workable mix. Too much water creates weak, porous concrete.
Performance-Enhancing Additives (The Secret Ingredients):
- Water Reducer / Superplasticizer: This chemical is magic. It allows your mix to become very fluid and flow into detailed corners without adding excess water. It’s the key to achieving a strong and workable mix.
- Polymer / Acrylic Fortifier: This milky white liquid replaces a portion of the water in your mix. It acts like a powerful glue, dramatically increasing the concrete’s flexural strength (resistance to bending), reducing shrinkage cracks, and improving its bond.
- AR (Alkali-Resistant) Glass Fibers: These are tiny, hair-like fibers mixed into the concrete. They act like microscopic rebar, providing tensile strength throughout the entire piece and helping to prevent cracking.
Coloring Your Creation:
Use integral pigments. These are iron oxide powders that are added to the mix to color the concrete all the way through.
- Tip: Add the pigment to your mixing water first and dissolve it completely before adding the dry ingredients. This ensures an even, streak-free color. Start with small amounts; a little goes a long way. The wet color will be much darker than the final cured color.
Part 5: The Moment of Creation – The Pour
Your mold is ready. Your mix is chosen. The time has come. Work deliberately and without panic.
- Preparation is Key: Lightly coat your mold with your chosen mold release agent. Wipe out any excess. Have all your tools, including a bucket of clean water for initial cleanup, ready to go.
- Mixing: Whether from a bag or from scratch, follow a consistent process. Combine dry ingredients first. Then, slowly add your liquids while mixing with a heavy-duty drill and paddle mixer. Aim for a consistency like thick yogurt or pancake batter—flowable, but not soupy. Mix for a solid 3-5 minutes.
- The Pour: Pour the concrete into the mold in stages. Don’t just dump it all in at once.
- THE SECRET TO PERFECTION: VIBRATION. This is the step that separates a pinhole-riddled amateur piece from a dense, professional-grade casting. Vibration consolidates the mix, eliminates air bubbles, and ensures the concrete perfectly captures every detail of the mold.
- How to Vibrate: You don’t need expensive equipment. You can firmly tap the sides of the mold with a rubber mallet. A more effective method is to strap an orbital sander (with no sandpaper) to your workbench or directly to the mold walls and turn it on. The high-frequency vibration is incredibly effective. Vibrate for several minutes, working your way around the mold. You will see air bubbles rise to the surface and pop. When the bubbles stop, your job is done.
- Positioning the Inner Mold: If using the found-object or rigid-box method, now is the time to slowly and evenly press your inner mold into the wet concrete. Use a heavy weight (bricks, sandbags) to hold it down and centered. Measure the wall thickness on all sides to ensure it’s even.
Part 6: The Quiet Cure – The Science of Strength
Your work is not done. The next 48 hours are critical. Concrete does not “dry”; it cures via a chemical reaction called hydration. This reaction requires water to build its crystalline structure. If it dries out too quickly, the reaction stops, and the concrete will be weak.
- Cover It: As soon as you are done casting, loosely cover the mold with a plastic sheet. This traps the moisture and humidity, ensuring a slow, even cure.
- Be Patient: Let the planter cure undisturbed in the mold for at least 48-72 hours. Don’t get impatient. The longer it cures in this ideal, moist environment, the stronger it will be.
Part 7: The Unveiling and Refinement – From Casting to Sculpture
This is the most exciting moment. It’s time to de-mold and see what you have created.
- De-molding: Work carefully. Unscrew the walls of your rigid mold or gently flex your silicone/plastic mold. The planter will pop free. The inner plug might require some gentle persuasion.
- Assessing the Surface: Your planter will have a raw, cast finish. It might have sharp edges (seams) and a few small pinholes. Now, you decide on the final aesthetic.
- Option 1: The Raw, Brutalist Finish: Simply use a piece of 120-grit sandpaper to knock down the sharp edges and seams. Leave the surface texture as-is. This is a beautiful, honest look that celebrates the casting process.
- Option 2: The Honed, Silky Finish: This involves wet-sanding the surface to expose the fine sand aggregate and create a smooth, tactile feel.
- Process: Using waterproof sandpaper or diamond hand pads, start with a coarse grit (like 120 or 220) and sand the entire surface under a trickle of water. This will grind away the thin top layer of cement paste.
- Work your way up through the grits: 400, then 800. The surface will transform from rough to a beautifully smooth, matte, or satin finish.
- The Pro Step: Creating a Slurry: If you have noticeable pinholes, you can fill them. Mix a small amount of pure Portland cement (and pigment if you used it) with some acrylic polymer into a thick paste. Trowel this “slurry” over the entire surface, forcing it into the holes. Let it cure for a day, then wet-sand it off with a 220 or 400 grit pad. The slurry will remain only in the holes, leaving you with a dense, solid surface.
Part 8: The Final Touches – Sealing and Planting
- Sealing: Concrete is porous. To protect your planter from staining and water damage, and to prevent minerals from leaching out and creating a white haze (efflorescence), you should seal it.
- Let it Dry: Ensure your planter is completely dry before sealing (wait at least a week after de-molding).
- Choose a Sealer: Use a high-quality penetrating sealer designed for concrete or masonry. A “wet look” sealer will darken and enrich the color, while a “natural look” sealer will be nearly invisible. Apply 2-3 thin coats according to the manufacturer’s instructions.
- Planting:
- Place a piece of screen mesh over the drain hole to prevent soil from washing out.
- Add a 1-inch layer of gravel or LECA for improved drainage.
- Choose a high-quality potting mix appropriate for your plant.
- Plant your chosen specimen and give it a good watering.
Conclusion: A Quiet Monument to Your Craft
Step back and admire your work. You have taken industrial dust, sand, and water and transformed them into a piece of functional art. This planter is not a disposable plastic pot from a big-box store. It has weight. It has character. It has a story—your story of design, of effort, of creation.
It will stand on your windowsill, your patio, or your hearth for years to come, a quiet monument to your craft. It will hold life, evolving with the seasons as its plant companion grows and changes. You didn’t just make a planter; you made an heirloom. You engaged in the primal, satisfying act of making something real, something beautiful, and something that will last. Now, what will you create next?