Once relegated to basements and garages, concrete floors are stepping into the limelight of interior design. With their industrial-chic appeal and surprising versatility, they offer a durable and stylish foundation for any room. But what truly elevates a simple concrete slab into a design statement is the art of staining. This comprehensive guide will walk you through everything you need to know about staining your concrete floors, from choosing the right stain to advanced techniques for a custom look, ensuring a stunning and lasting finish.
The Allure of Stained Concrete: More Than Just a Pretty Surface
Before we delve into the “how-to,” let’s explore the “why.” Stained concrete floors offer a multitude of benefits that make them an attractive option for homeowners and designers alike.
Durability and Longevity: Concrete is inherently tough, and a properly stained and sealed floor is incredibly resilient.[1][2] It can withstand heavy foot traffic, resist wear and tear, and, with the right care, maintain its beauty for years to come.[1][3] Unlike other flooring options, you won’t have to worry about scratches from pets’ claws or damage from dropped objects. Acid-stained concrete, in particular, is less susceptible to peeling, chipping, discoloration, and fading.[2]
Low Maintenance: Say goodbye to the demanding upkeep of carpets and hardwood. Stained concrete floors are a breeze to maintain.[3] Regular sweeping or vacuuming, followed by occasional mopping with a pH-neutral cleaner, is all it takes to keep them looking their best.[4][5][6] There’s no need for waxing or polishing to maintain their shine.[7]
Aesthetic Versatility: The design possibilities with stained concrete are virtually endless. From subtle earthy tones that mimic natural stone to vibrant and bold hues, there’s a color and style to suit every taste and interior design theme.[2][3] The application techniques, which we’ll explore later, allow for an incredible range of finishes, from a uniform color to a marbled, multi-toned effect.[8]
Cost-Effective Elegance: Stained concrete offers a high-end look without the hefty price tag of materials like marble or granite.[4] It provides excellent value, enhancing the overall aesthetic and potentially increasing the value of your home.[3] The cost to stain and seal a concrete floor yourself can be as low as 50 cents per square foot.[9]
Eco-Friendly Choice: By utilizing the existing concrete slab, you’re reducing the need for new materials and minimizing waste.[1] Many water-based stains are low in volatile organic compounds (VOCs), making them a more environmentally friendly option.
Choosing Your Weapon: A Deep Dive into Concrete Stains
The first crucial decision you’ll make is the type of stain to use. The two main contenders are acid-based stains and water-based stains, each with its own unique characteristics and application methods.
Acid-Based Stains: The Alchemist’s Choice
Acid stains, also known as reactive stains, create a chemical reaction with the lime content in the concrete.[10][11] This reaction etches the surface and creates a rich, variegated, and translucent color that is permanent and won’t chip or peel.[2]
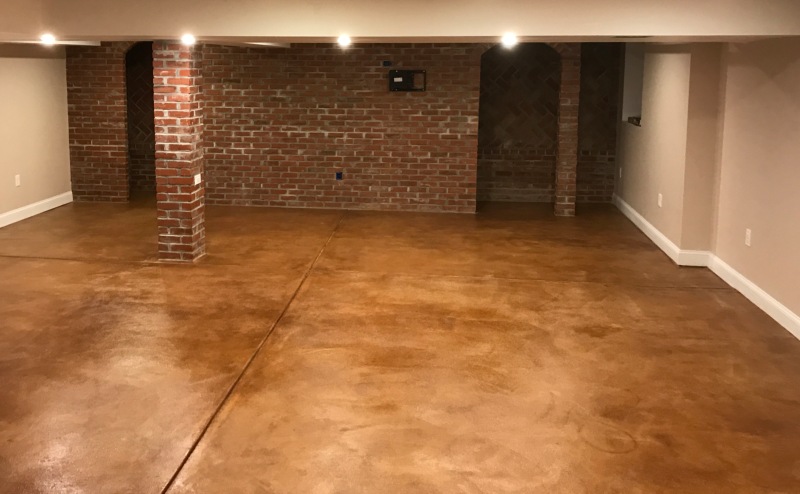
- The Look: Acid stains produce earthy tones like tans, browns, reddish-browns, and soft blue-greens.[12][13] The final color is a result of the chemical reaction, so it can be unpredictable and will vary from one concrete slab to another, and even within the same floor. This creates a truly one-of-a-kind, mottled appearance that can resemble natural stone, marble, or even leather.[4][11]
- Pros:
- Cons:
- Limited color palette: Primarily earthy tones are available.[16]
- Unpredictable results: The final color can vary depending on the composition and age of the concrete.[17]
- More complex application: Requires neutralization of the acid after staining and more extensive cleanup.[17]
- Health and safety precautions: The acid is corrosive and requires careful handling and proper ventilation.[18]
Water-Based Stains: The Artist’s Palette
Water-based stains are non-reactive and work by penetrating the pores of the concrete to deposit pigment.[10] They offer a much wider range of colors and more predictable results than their acid-based counterparts.
- The Look: With water-based stains, you can achieve a vast spectrum of colors, from subtle earth tones to vibrant reds, blues, yellows, and even metallic hues.[12][19] The color is more uniform and opaque than that of acid stains, though you can still create mottled effects by blending different colors.[17]
- Pros:
- Wide range of colors: The color possibilities are almost limitless.[16]
- Predictable and consistent color: What you see on the color chart is generally what you get.[10]
- Easier and safer to apply: They are low in VOCs and don’t require neutralization, making cleanup simpler.[11][17]
- Environmentally friendly: A safer option for indoor applications.[20]
- Cons:
- Less durable than acid stains: While still very durable when sealed, the color is a coating on the surface and can be more susceptible to wear over time in very high-traffic areas.[12]
- May not be as effective on previously sealed concrete: The sealer must be completely removed for the stain to penetrate.
Concrete Dyes: For Vibrant, Fast Results
Concrete dyes are another option for adding color to your floors. They are much smaller in particle size than water-based stains and penetrate deeper into the concrete.
- The Look: Dyes are known for their vibrant, intense colors and can be used to create bold, uniform finishes or layered for multi-tonal effects.[14]
- Pros:
- Cons:
The Prep Work: Laying the Foundation for a Flawless Finish
The success of your concrete staining project hinges on meticulous surface preparation.[22][23] Skipping this crucial step can lead to a host of problems, including poor stain adhesion, uneven color, and a finish that won’t last.
Step 1: Clear and Clean the Area
Begin by removing all furniture, rugs, and any other items from the room.[15] It’s also a good idea to remove baseboards to avoid getting stain on them.[15] Thoroughly sweep and vacuum the floor to remove all dust and debris.[24]
Step 2: Deep Clean and Degrease
Next, you’ll need to deep clean the concrete to remove any dirt, grime, oil, grease, or other contaminants that could prevent the stain from penetrating properly.[8] For general cleaning, a mixture of a pH-neutral cleaner and water is a good choice.[4] Avoid harsh chemicals like bleach, ammonia, or muriatic acid for cleaning, as they can interfere with the staining process.[1][25]
For stubborn oil and grease stains, a concrete degreaser will be necessary.[26] To identify invisible stains from oil or pet urine, spray the floor with water.[27][28] The water will darken the concrete and reveal the locations of these hidden contaminants.[27]
Step 3: Remove Existing Coatings
If your concrete floor has been previously painted, sealed, or has any other coating, it must be completely removed.[22] Stains need to penetrate the concrete, and any existing coating will act as a barrier. You can check for a sealer by pouring a small amount of water on the floor. If the water beads up, there’s a sealer present that needs to be stripped.[15]
Removing coatings can be a labor-intensive process. For paint, you may need to use a paint stripper or a concrete grinder.[26] For old sealers, a chemical stripper may be effective.[26] Grinding the floor is often the most effective way to remove coatings and create a fresh, porous surface ready for staining.[26]
Step 4: Repair Cracks and Imperfections
Inspect the floor for any cracks, holes, or other imperfections. These should be repaired before you begin staining. Use a concrete patch or repair compound to fill any cracks, following the manufacturer’s instructions.[22] Allow the repairs to cure completely before proceeding.
Step 5: Etching (for Acid Stains)
If you are using an acid stain, you may need to etch the concrete. This process opens up the pores of the concrete, allowing the stain to penetrate more deeply and react more effectively.[22] A concrete etch and cleaner can be used for this purpose. Always follow the product’s instructions carefully and ensure the area is well-ventilated.
Step 6: Mask and Protect
Before you start staining, use painter’s tape and plastic sheeting to protect walls, doorways, and any other areas you don’t want to get stain on.[22][29]
The Main Event: Applying the Concrete Stain
With your floor prepped and ready, it’s time for the most exciting part: applying the stain. The application method will vary depending on the type of stain you’re using.
Applying Acid Stain
- Safety First: Acid staining requires strict adherence to safety precautions. Wear chemical-resistant gloves, safety goggles, a respirator, and long-sleeved clothing to protect yourself from the acid.[18][29] Ensure the area is extremely well-ventilated by opening windows and using fans.[29]
- Test in an Inconspicuous Area: Always test the stain on a small, hidden area of the floor first to see how the color develops.[22] This will give you an idea of the final look and help you determine if you need to adjust the application technique.
- Application: The most common method for applying acid stain is with a plastic, acid-resistant pump sprayer.[22] Work in small, manageable sections, applying the stain in a circular or figure-eight motion to create a more natural, mottled effect.[22] Have a partner follow behind you with a stiff-bristled brush to work the stain into the concrete, which helps to ensure an even application.[15]
- Let it React: Allow the acid stain to react with the concrete for the manufacturer-recommended time, typically several hours.[22]
- Neutralize the Acid: After the reaction is complete, you must neutralize the acid residue.[29] A solution of baking soda and water or a commercial neutralizer can be used.[29] Spray the neutralizer over the entire surface and scrub it with a brush.[15]
- Rinse Thoroughly: The next step is to thoroughly rinse the floor with clean water to remove all the stain residue and neutralizer.[24] This may require several rinses. Use a wet vac to remove the excess water.[22] The floor must be completely clean and dry before sealing.
Applying Water-Based Stain
- Safety Precautions: While water-based stains are less hazardous than acid stains, it’s still a good idea to wear gloves and eye protection.[18] Ensure good ventilation in the area.[16]
- Test Area: As with acid stains, test the water-based stain on a small, inconspicuous area first.
- Application: Water-based stains can be applied with a pump sprayer, a roller, or even a brush for smaller areas.[24] When using a sprayer, apply the stain in a circular motion, overlapping your strokes to avoid harsh lines.[22] If you’re using a roller, maintain a “wet edge” to prevent lap marks.[24]
- Create Custom Effects: Water-based stains offer more control for creating custom looks. You can layer different colors, use sponges or rags to create texture, or even use stencils to create patterns.[30]
- Drying Time: Allow the stain to dry completely according to the manufacturer’s instructions. Additional coats can be applied to deepen the color.
The Finishing Touch: Sealing Your Stained Concrete Floor
Sealing is a non-negotiable step in the concrete staining process.[20] A good sealer will protect your newly stained floor from stains, moisture, and wear, while also enhancing the color and adding a beautiful sheen.[31]
Choosing the Right Sealer
There are three main types of concrete sealers, each offering different levels of protection and finish:
- Acrylic Sealers: These are the most common and affordable type of sealer. They are easy to apply and come in both water-based and solvent-based formulas.[13][32] Acrylic sealers are a good choice for interior residential applications. They form a thin, protective film on the surface and are available in various sheen levels, from matte to high-gloss.[32][33] They may require more frequent reapplication in high-traffic areas.[31]
- Epoxy Sealers: Epoxy sealers are much harder and more durable than acrylics, making them an excellent choice for high-traffic areas, garages, and commercial spaces.[32][34] They form a thick, protective layer that is highly resistant to abrasion and chemicals.[32] However, they are not UV stable and can yellow in direct sunlight, so they are best suited for interior use.[32]
- Urethane (Polyurethane) Sealers: Urethane sealers are the most durable and chemical-resistant option.[19] They are also UV stable, making them suitable for both interior and exterior applications.[32] Urethanes are often applied as a topcoat over an epoxy sealer for the ultimate in protection. They are more expensive than acrylics and epoxies.
The Sealing Process
- Ensure the Floor is Completely Dry: Before applying sealer, the stained concrete must be thoroughly dry.[15] Trapped moisture can cause the sealer to become cloudy or hazy.[3]
- Apply the Sealer: Apply the sealer in thin, even coats using a roller or sprayer.[32] Follow the manufacturer’s instructions for the number of coats and drying times between coats.
- Curing Time: Allow the sealer to cure completely before walking on the floor or moving furniture back into the room. This can take anywhere from 24 to 72 hours, depending on the type of sealer and environmental conditions.[15]
Beyond the Basics: Advanced Staining Techniques for a Custom Look
Once you’ve mastered the basics of concrete staining, you can start to explore more advanced techniques to create truly unique and personalized floors.
- Layering Colors: Apply a base color and then use a sprayer, sponge, or rag to add accent colors.[30] This is a great way to create depth and dimension. When highlighting, apply a lighter color first, let it dry, and then lightly mist a darker color over it.[35]
- Creating Patterns with Tape or Stencils: Use painter’s tape or pre-made stencils to create geometric patterns, borders, or even intricate designs.[30] Apply the stain and then remove the tape or stencil to reveal the design.
- Saw Cuts: For a more dramatic effect, you can use a concrete saw to cut shallow grooves into the floor to create patterns like tiles, diamonds, or custom designs.[36] The grooves can then be stained a different color to create a striking contrast.
- Faux Finishes: With a little creativity, you can use stains to mimic the look of other materials, such as wood planks or natural flagstone.
Troubleshooting Common Staining Problems
Even with the best preparation, you may encounter some issues during your staining project. Here are some common problems and how to address them:
- Blotchy or Uneven Color: This is often caused by inadequate surface preparation, contaminants on the concrete, or inconsistent application.[23] To fix it, you may need to apply another coat of stain to even out the color. In some cases, you may need to strip the sealer and re-stain the affected areas.[37]
- Stain Not Taking: If the stain isn’t penetrating the concrete, it’s likely that there is a sealer or other coating on the surface that wasn’t completely removed.[26] The only solution is to strip the floor and start the preparation process over.
- Sealer is Cloudy or Hazy: This is usually caused by trapped moisture.[38] You may be able to fix it by applying a xylene solvent to the affected area, which can help the moisture escape.[3] If that doesn’t work, you may need to strip the sealer and reapply it.
- Scratches in the Sealer: Minor scratches can often be repaired by applying a fresh coat of wax or sealer to the affected area.[26] For deeper scratches that have penetrated the stain, you may need to touch up the stain before resealing.[26]
Long-Term Care and Maintenance: Protecting Your Investment
One of the biggest advantages of stained concrete floors is their low maintenance. However, a little bit of regular care will go a long way in preserving their beauty and durability.
- Daily/Weekly Cleaning: Sweep or dust mop your floors daily to remove dirt and grit that can act like sandpaper and dull the finish.[5][17] Mop weekly with a pH-neutral cleaner and a microfiber mop.[1][22]
- Wipe Up Spills Immediately: Clean up spills as soon as they happen to prevent them from staining the sealer.[39]
- Use Protective Pads: Place felt pads under furniture legs to prevent scratching the sealer.
- Resealing: Depending on the amount of foot traffic, you will need to reseal your floors every 2-5 years to maintain the protective barrier.[5][17]
- Waxing (Optional): For extra protection in high-traffic areas, you can apply a sacrificial layer of floor wax over the sealer.[6] The wax can be easily stripped and reapplied as needed, which will extend the life of your sealer.[5]
DIY vs. Hiring a Professional: Making the Right Choice
Staining a concrete floor can be a rewarding DIY project, but it’s not for the faint of heart. It requires careful preparation, attention to detail, and a willingness to get your hands dirty.
DIY:
- Pros: Significantly lower cost. The satisfaction of completing the project yourself.
- Cons: Time-consuming and labor-intensive. Mistakes can be difficult and costly to fix. Requires renting or purchasing specialized equipment.
Hiring a Professional:
- Pros: Professional results. Access to high-quality materials and equipment. Expertise in troubleshooting and creating custom finishes. Saves you time and effort.
- Cons: Higher cost.
The decision of whether to DIY or hire a pro ultimately depends on your budget, your timeline, and your comfort level with home improvement projects. If you’re on a tight budget and have some experience with similar projects, a DIY approach can be a great option. However, if you’re looking for a flawless, professional finish or have a complex design in mind, it’s probably best to leave it to the experts.
Final Thoughts: A Floor That’s as Unique as You Are
Staining your concrete floors is more than just a home improvement project; it’s an opportunity to create a truly unique and personalized space. With a little bit of knowledge, a lot of preparation, and a touch of creativity, you can transform a dull, utilitarian surface into a stunning and durable work of art. So, roll up your sleeves, choose your colors, and get ready to create a floor that will be the envy of your neighborhood.