Troubleshooting Common Concrete Problems: Your concrete driveway, patio, and walkways are the unsung heroes of your home’s exterior. They withstand daily foot and vehicle traffic, endure the wrath of changing seasons, and provide a clean, stable surface for your outdoor life. But what happens when these sturdy surfaces begin to show signs of wear and tear? Unsightly pits, flaky patches, and rough, crumbling sections can not only detract from your home’s curb appeal but also signal underlying issues that could lead to more significant damage down the line.
This comprehensive guide will delve into three of the most common concrete afflictions: pitting, spalling, and scaling. We’ll explore what these terms mean, what causes them, and most importantly, provide you with detailed, step-by-step instructions on how to repair them. We’ll also break down the costs of both DIY and professional repairs and offer guidance on when to roll up your sleeves and when to call in the experts.
Distinguishing the Damage: Pitting vs. Spalling vs. Scaling
While these terms are sometimes used interchangeably, they describe distinct types of concrete surface failure. Understanding the difference is the first step in diagnosing the problem and choosing the correct repair method.
Pitting: This refers to the formation of small, crater-like holes or depressions on the concrete surface. These pits can be shallow or deep and are often the result of air bubbles trapped in the concrete mix during installation, or the impact of heavy objects. Pitting can also be a precursor to more severe damage like spalling.
Spalling: Often described as a more severe condition than pitting, spalling is when the surface of the concrete chips, flakes, or breaks away in larger chunks. This can expose the rough aggregate (the small stones in the concrete mix) and, in some cases, even the steel reinforcement bars (rebar) within the slab. Spalling compromises both the appearance and the structural integrity of the concrete.
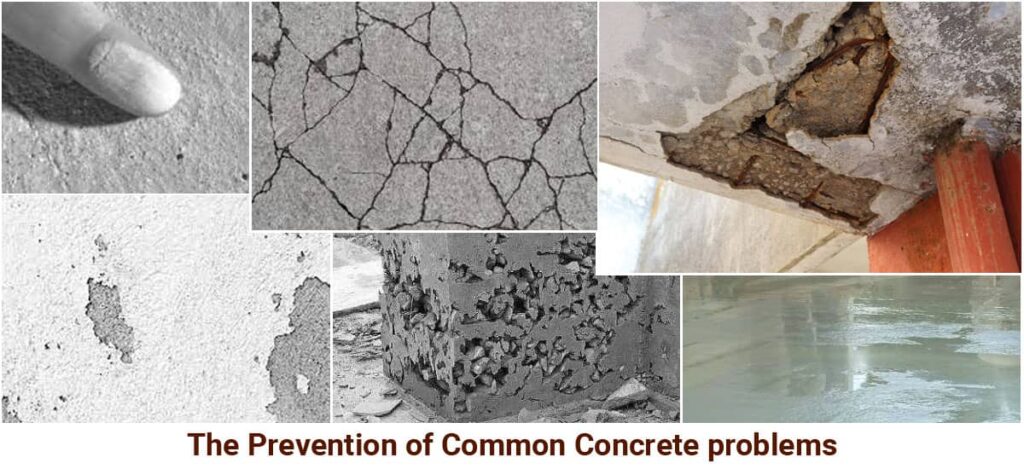
Scaling: This is the gradual peeling or flaking of the top layer of the concrete, often over a wide area. Scaling is typically a surface-level issue and may not be as deep as spalling, but it can still leave the concrete with a rough, uneven texture.
The Culprits Behind Concrete Decay: Common Causes of Pitting, Spalling, and Scaling
Several factors can contribute to the deterioration of your concrete surfaces. Understanding these causes is crucial for both repairing the existing damage and preventing future problems.
1. Freeze-Thaw Cycles: This is one of the most common culprits, especially in colder climates. Concrete is a porous material that can absorb water. When this water freezes, it expands, creating immense internal pressure that can cause the surface to crack, pit, and spall.
2. De-Icing Salts: The chemicals used to melt ice and snow on driveways and walkways can be incredibly damaging to concrete. These salts can accelerate the freeze-thaw process and chemically attack the concrete, leading to surface deterioration.
3. Poor Installation and Finishing Techniques: The quality of the initial concrete installation plays a significant role in its long-term durability. A concrete mix with too much water, improper curing, or over-troweling can result in a weak surface that is more susceptible to damage.
4. Corrosion of Steel Reinforcement: If you have reinforced concrete, moisture and chemicals can seep through the pores and cause the internal steel rebar to rust. As the steel corrodes, it expands, putting pressure on the surrounding concrete and causing it to spall.
5. Heavy Traffic and Impact: Constant use by vehicles or the impact of heavy objects can lead to pitting and cracking over time.
DIY Concrete Repair: A Step-by-Step Guide
For minor to moderate pitting, spalling, and scaling, a DIY repair is often a feasible and cost-effective solution. Here’s a detailed guide to get you started.

Step 1: Surface Preparation – The Foundation of a Lasting Repair
Proper surface preparation is arguably the most critical step in any concrete repair project. A clean, sound surface ensures that the patching material will bond correctly and create a durable repair.
Tools and Materials Needed:
- Safety glasses and gloves
- Stiff-bristled brush or wire brush
- Hammer and chisel
- Pressure washer (highly recommended)
- Concrete degreaser or cleaner
Procedure:
- Clear the Area: Remove any furniture, planters, or other items from the concrete surface.
- Remove Loose Debris: Use a stiff-bristled brush to sweep away any loose dirt, leaves, and other debris.
- Chip Away Unsound Concrete: For spalled or heavily pitted areas, use a hammer and chisel to remove any loose, crumbling, or flaking concrete. The goal is to get down to a solid, stable base.
- Deep Clean with a Pressure Washer: A pressure washer is the most effective way to thoroughly clean the concrete and remove any ingrained dirt, grime, or old sealers. Use a concrete degreaser for any oil or grease stains, following the manufacturer’s instructions.
- Rinse Thoroughly: After cleaning, rinse the entire surface with clean water to remove any remaining cleaning residue.
- Allow to Dry: Let the concrete dry completely before proceeding to the next step. The surface should be damp but not puddled when you apply the patching material.
Step 2: Patching and Repairing the Damage
Once the surface is clean and prepped, it’s time to apply the patching material. The type of product you use will depend on the extent and depth of the damage.
Tools and Materials Needed:
- Concrete patching compound or resurfacer (choose a product suitable for your specific issue)
- Bucket for mixing
- Drill with a paddle mixer (for larger batches)
- Trowel or putty knife
- Squeegee (for resurfacing larger areas)
For Minor Pitting and Small Spalls:
- Choose the Right Product: For small, isolated pits and spalls, a pre-mixed concrete patching compound is often the easiest to use. For slightly larger areas, a vinyl-reinforced patching compound can provide a durable repair.
- Mix the Patching Compound: Follow the manufacturer’s instructions to mix the patching compound to the consistency of peanut butter.
- Apply the Patch: Using a trowel or putty knife, press the patching compound firmly into the pitted or spalled area, ensuring there are no air bubbles.
- Feather the Edges: Smooth the patch so that it is level with the surrounding concrete and feather the edges for a seamless transition.
- Cure the Patch: Follow the product’s instructions for curing times. This may involve keeping the patch damp for a certain period.
For Widespread Scaling and Shallow Spalling (Resurfacing):
- Choose a Resurfacer: For larger areas of surface damage, a concrete resurfacer is the best option. This is a cement-based product that is applied in a thin layer over the entire surface to create a new, uniform finish.
- Mix the Resurfacer: Mix the resurfacer according to the manufacturer’s directions. It should have a pourable, pancake-batter-like consistency.
- Dampen the Concrete: Lightly mist the concrete with water before applying the resurfacer.
- Pour and Spread: Pour the resurfacer onto the concrete and spread it evenly over the surface using a long-handled squeegee. Work in small, manageable sections.
- Create a Non-Slip Finish: After the resurfacer has been spread, you can create a non-slip texture by dragging a clean broom lightly across the surface in one direction.
- Cure Properly: Proper curing is crucial for the strength and durability of the resurfaced concrete. Follow the manufacturer’s instructions, which may involve covering the surface with plastic sheeting to retain moisture.
Step 3: Sealing for Long-Term Protection
After your repairs have fully cured, applying a quality concrete sealer is a vital final step. A sealer will protect your newly repaired concrete from moisture, chemicals, and UV rays, preventing future damage and extending its lifespan.
Types of Concrete Sealers:
- Penetrating Sealers (Silane/Siloxane): These soak into the concrete to form a water-repellent barrier without changing the appearance of the surface. They are an excellent choice for driveways in freeze-thaw climates.
- Film-Forming Sealers (Acrylic, Epoxy, Polyurethane): These create a protective layer on the surface of the concrete and can enhance its color with a satin or gloss finish.
Application:
- Ensure the Concrete is Clean and Dry: The repaired surface must be completely clean and dry before applying a sealer.
- Apply the Sealer: Use a roller or sprayer to apply the sealer according to the manufacturer’s instructions. It’s generally best to apply two thin coats for even coverage.
- Allow to Cure: Let the sealer cure completely before allowing foot or vehicle traffic on the surface.
Cost Breakdown: DIY vs. Professional Concrete Repair
The cost of repairing your concrete will vary significantly depending on the extent of the damage, the size of the area, and whether you do it yourself or hire a professional.
DIY Repair Costs:
- Small Patching Jobs: For minor pitting and a few small spalls, you can expect to spend $50 to $150 on materials like patching compound, a trowel, and a wire brush.
- Resurfacing a Driveway: For a standard two-car driveway (around 600 square feet), the cost of materials for resurfacing can range from $200 to $400. This includes the resurfacing mix and the rental of a pressure washer.
- Sealing: A good quality concrete sealer will cost between $30 and $75 per gallon, which typically covers 200-400 square feet.
Professional Repair Costs:
- Patching and Crack Filling: For minor repairs, a professional may charge a minimum service fee of $100 to $300.
- Spalling/Scaling Repair: For more extensive spalling or scaling, expect to pay $3 to $5 per square foot. For a 600-square-foot driveway, this could range from $1,800 to $3,000.
- Concrete Resurfacing: The cost for professional concrete resurfacing typically ranges from $3 to $7 per square foot. For a two-car driveway, the total cost would likely be between $1,200 and $2,900.
- Complete Replacement: In cases of severe, deep-seated damage, replacement may be the only option. The cost to tear out and replace a concrete driveway can be $6 to $15 per square foot or more.
When to Call a Professional: Knowing Your Limits
While DIY repairs can be a great way to save money, some situations are best left to the professionals. Here’s how to decide:
Consider a DIY Repair If:
- The damage is minor and cosmetic (small pits, shallow spalls, light scaling).
- You have some experience with home improvement projects and are comfortable working with concrete repair materials.
- You have the necessary tools and are willing to put in the time and effort for proper surface preparation.
Call a Professional If:
- The Damage is Structural: If you see large, deep cracks (wider than a quarter-inch), significant sinking or heaving of the concrete, or exposed and corroded rebar, this could indicate a problem with the underlying subgrade or a more serious structural issue.
- The Damage is Widespread: If a large portion of your driveway or patio is severely spalled or scaled, a professional will have the equipment and expertise to complete the job efficiently and with a high-quality finish.
- You Lack the Time or Confidence: Concrete repair, especially resurfacing, can be a physically demanding and time-consuming project. If you’re not confident in your ability to achieve a good result, hiring a professional can save you from a costly mistake.
Prevention: The Best Medicine for Your Concrete
Once you’ve repaired your concrete, or if you’re looking to protect new concrete, prevention is key. Here are some tips to keep your concrete looking its best for years to come:
- Seal Your Concrete Regularly: Applying a quality sealer every few years is the single most important thing you can do to protect your concrete.
- Avoid Harsh De-Icing Chemicals: Instead of rock salt, opt for sand or a concrete-safe de-icer during the winter months.
- Ensure Proper Drainage: Make sure that water is not pooling on your concrete surfaces. Direct downspouts away from driveways and patios.
- Clean Spills Promptly: Oil, gasoline, and other chemicals can stain and damage concrete. Clean them up as soon as they occur.
By understanding the causes of concrete problems, following the proper repair procedures, and implementing preventative maintenance, you can ensure that your concrete surfaces remain a durable and attractive feature of your home for many years. A little bit of effort now can save you from major headaches and expenses down the road.