How to Pour a Perfect Concrete Slab: There is something elemental about concrete. It is the stuff of foundations, of highways, of monuments. It is modern man’s most prolific building material, a liquid stone we can mold to our will. To work with it is to create something of substance, something with a satisfying, immovable permanence.
And a concrete slab? A slab is more than just a flat piece of rock. It’s a promise. It’s the future foundation for a workshop where dreams will be built, a patio where family will gather for generations, a sturdy base for a hot tub, or a simple, clean floor for a garden shed. Pouring one yourself is one of the most ambitious, challenging, and profoundly rewarding projects a homeowner can undertake.
This is not a project for the faint of heart. It demands meticulous planning, brute force, and a surprising amount of finesse. There are no “undo” buttons. But with the right knowledge and a healthy respect for the material, pouring a perfect concrete slab is absolutely within your reach.
Forget the quick, five-step listicles. This is your masterclass. We will journey from the first scratch of a plan on a napkin to the final, sacred act of curing. We will cover the science, the art, and the sweat. By the end of this guide, you will be armed with the knowledge to create your own monolith—a perfect, durable, and beautiful concrete slab that will likely outlast you.
Let’s begin.
Part 1: The Blueprint for Success – 80% of the Work is Done Before the Concrete Arrives
The cardinal sin of concrete work is impatience. A successful pour is a direct result of obsessive preparation. The quality of your slab is determined long before you hear the rumble of a concrete truck or rip open the first bag. This is the intellectual phase, where you become an architect, an engineer, and a logistician.
Step 1: Define the Mission – What is This Slab For?
The purpose of your slab dictates its most important characteristic: its thickness. A slab is not a one-size-fits-all solution.
- Patio or Walkway (Foot Traffic): A 4-inch (100mm) thick slab is the standard. It’s plenty strong for people, patio furniture, and grills.
- Shed or Workshop Floor: 4 inches is still generally sufficient, especially if you’re only storing lawn equipment and tools.
- Driveway, Garage Floor, or Pad for a Vehicle: You need to step up to 5 or even 6 inches (125-150mm) to handle the significant point loads and repeated stress of vehicles.
- Hot Tub or Spa Pad: These are incredibly heavy. A 6-inch slab with robust reinforcement is highly recommended. Don’t skimp here; a failing slab under a 5,000-pound tub of water is a nightmare.
Pro-Tip: Remember that these are finished thicknesses. You will need to excavate deeper to accommodate the sub-base.
Step 2: Location, Location, Location – Siting Your Slab
Before you break ground, consider the slab’s environment.
- Drainage is King: Water is concrete’s enemy after it has cured. Never place a slab in a low-lying area where water will pool. Your slab must have a gentle, almost imperceptible slope to direct water away from your house’s foundation and into a safe runoff area. A standard slope is ¼ inch of fall for every 1 foot of run (a 2% grade).
- Call Before You Dig: This is not a suggestion; it’s a command. In the US, call 811. In other countries, find your local utility locating service. You absolutely must know what is buried beneath your project area—water lines, gas lines, electrical conduits, and sewer pipes. Hitting one of these can be catastrophic and expensive.
- Check Local Codes and Permits: Many municipalities have regulations about “impervious surfaces” (like concrete) and setback requirements from property lines. A quick call to your local building department can save you a world of headaches, fines, or even a demolition order.
- Think About the Sun and Shade: For a patio, consider how the sun will track across it during the day and through the seasons. Will it be a blistering heat island in the summer, or a pleasant, sun-drenched spot in the spring?
Step 3: Layout and Squaring – From a Sketch to Reality
Time to put stakes in the ground. You’ll need a tape measure, a hammer, some wooden stakes, and mason’s string.
- Stake One Corner: Drive your first stake to mark a starting corner.
- Measure and Stake the First Side: Measure out the length of your first side and drive a second stake. Run a taut string line between them.
- The Magic of the 3-4-5 Triangle: Getting a perfect 90-degree corner is crucial. This is where high school geometry pays off. The 3-4-5 rule states that if a triangle has sides measuring 3 units, 4 units, and 5 units, the angle between the 3 and 4 unit sides will be a perfect 90 degrees.
- From your first stake, measure 3 feet along your string line and make a mark.
- From that same first stake, measure out roughly 4 feet in the direction of your second side.
- Now, have a helper hold the end of the tape measure at the 3-foot mark on your string. Extend the tape to the 5-foot mark. Pivot the other end of the tape (the end that started at the first stake) until the 4-foot mark on the ground and the 5-foot mark on the tape measure intersect perfectly.
- Place a stake at this intersection. You now have a perfect 90-degree corner. Run your second string line from the corner stake through this new stake.
- Complete the Box: Measure and stake the remaining sides, checking that your diagonal measurements are equal to ensure the entire layout is square.
Step 4: The Concrete Calculation – The Most Important Math You’ll Do
Running out of concrete mid-pour is a complete disaster. You must calculate your needs accurately and then add a buffer.
- Calculate the Volume: The formula is Length x Width x Depth = Volume.
- CRITICAL: You must use the same unit for all measurements. The easiest way is to convert everything to feet. A 4-inch slab is 0.333 feet thick (4 ÷ 12). A 6-inch slab is 0.5 feet.
- Example: For a 10 ft by 12 ft patio that is 4 inches thick:
- 10 ft x 12 ft x 0.333 ft = 39.96 cubic feet.
- Convert to Cubic Yards (if ordering ready-mix): There are 27 cubic feet in 1 cubic yard.
- 39.96 cubic feet ÷ 27 = 1.48 cubic yards.
- Add the 10% “Factor of Safety”: Always order extra. The ground is never perfectly level, and forms can have slight bows. A 10% buffer is standard.
- 1.48 cubic yards x 1.10 = 1.63 cubic yards.
- You would round up and order 1.75 cubic yards from the ready-mix company (they usually pour in quarter-yard increments).
- Calculate Bags (if mixing yourself): This is where you see the scale of the job. Check the bag for its yield (e.g., a 60lb bag yields 0.45 cubic feet).
- From our example, we need 39.96 cubic feet. Add 10%: 39.96 x 1.1 = 43.95 cubic feet.
- 43.95 cubic feet ÷ 0.45 cubic feet/bag = 97.6 bags.
- You would need to buy and mix nearly 100 bags of concrete. This brings us to a crucial decision…
Step 5: The Big Decision – Bagged Mix vs. Ready-Mix
- Bagged Concrete:
- Pros: Great for small slabs (e.g., A/C pad, a single walkway section). You can work at your own pace. Less initial cost for tiny jobs.
- Cons: Back-breaking labor. For any slab larger than ~50 sq. ft., it becomes a monumental task. It’s incredibly difficult to maintain consistency from batch to batch. More expensive per cubic yard than ready-mix.
- Ready-Mix (Truck Delivery):
- Pros: Perfect, consistent, high-quality concrete. Saves an immense amount of time and physical labor. More cost-effective for larger jobs (anything over about 1.5 cubic yards).
- Cons: You are on the clock. The truck arrives, and you have a limited time to get the concrete placed and finished. You need good access for a very large, heavy truck. There is often a minimum order size (a “short load” fee).
The Verdict: For anything larger than a small landing pad, ready-mix is almost always the superior choice. The quality and time savings are well worth the cost and logistical planning. This guide will proceed assuming a ready-mix delivery, but the finishing principles are universal.
Part 2: The Foundation of the Foundation – Site Work and Form Building
This is where the sweat begins. You are creating the stable, perfectly shaped vessel that will hold your liquid stone.
Step 1: Excavation – Digging for Victory
Using your string lines as a guide, it’s time to dig.
- Remove the Topsoil: The rich, black topsoil is full of organic material that will decompose and cause your slab to settle and crack. You must remove all of it, typically the top 4-6 inches.
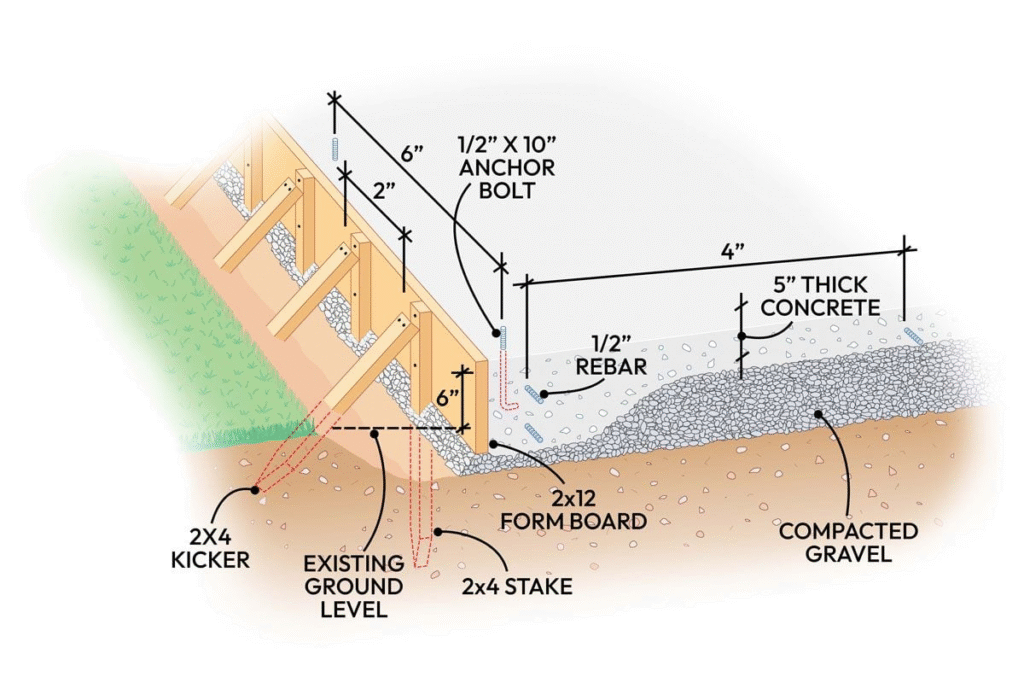
- Calculate Your Digging Depth: Your total depth = Slab Thickness + Sub-base Depth. For a 4-inch slab, you’ll want a 4-inch gravel sub-base. So, you need to excavate to a total depth of 8 inches below your desired final slab height.
- Ensure a Firm Base: After excavating, the ground beneath should be firm, undisturbed soil. Remove any large rocks, roots, or soft spots.
Step 2: The Sub-base – The Unsung Hero
Do not skip this step. A compacted gravel sub-base is critical for three reasons:
- It provides a stable, uniform platform for the slab.
- It allows for excellent drainage, preventing water from sitting under the slab and causing heaving during freeze-thaw cycles.
- It creates a capillary break, stopping ground moisture from wicking up into the concrete.
- Material: Use ¾-inch crushed stone, often called “Class 5,” “road base,” or simply “compactable gravel.”
- Placement: Add the gravel in 2-inch layers (“lifts”).
- Compaction is Non-Negotiable: For any slab of consequence, you must rent a plate compactor. A hand tamper is insufficient. Compact each lift until the gravel is locked in place and you can walk on it without leaving deep footprints. This solid, unyielding base is what prevents future cracking and settling.
Step 3: Building the Fortress – Your Formwork
The forms are the wooden mold that will give your slab its shape. They must be strong enough to resist the immense outward pressure of wet concrete.
- Material: 2x lumber is the standard. Use 2x4s for a 4-inch slab, 2x6s for a 6-inch slab. Look for straight, un-warped boards.
- Assembly: Cut your boards to length and assemble the frame around the perimeter of your excavated area. Screw the corners together securely.
- Staking: Drive wooden or steel stakes every 2-3 feet along the outside of the form boards. Drive them deep enough to be solid. Then, screw through the stake into the form board. This bracing is what holds everything together. Add diagonal “kicker” braces on long runs for extra support.
- Setting the Grade: This is where precision matters. Tie new string lines to the tops of your stakes to represent the final height of the slab. Use a line level or a laser level to set the slope you planned for earlier (e.g., ¼ inch drop per foot). Adjust the form boards up or down until the top edge of the forms perfectly matches the height and slope of your string lines. Check and double-check. The top of your forms is the final height of your slab.
Pro-Tip: Coat the inside face of your form boards with a form release agent, or even just diesel fuel or used motor oil on a rag. This will prevent the concrete from sticking, making the forms much easier to remove later.
Part 3: The Skeleton – Reinforcing for Tensile Strength
Concrete is incredibly strong in compression (resisting squeezing forces) but very weak in tension (resisting pulling-apart forces). Reinforcement provides this missing tensile strength, holding the slab together and helping to control cracking.
Option 1: Welded Wire Mesh (WWM)
- What it is: A grid of steel wires welded together, sold in rolls or flat sheets.
- Pros: Relatively inexpensive and easy to lay out for simple square or rectangular slabs.
- Cons: Can be difficult to keep flat (if from a roll) and, most importantly, it’s often installed incorrectly.
Option 2: Rebar (Reinforcing Bar)
- What it is: Steel rods with a ribbed texture for better grip in the concrete. Typically #3 (⅜-inch) or #4 (½-inch) rebar is used for slabs.
- Pros: Provides superior structural strength compared to mesh. The go-to choice for driveways, hot tub pads, or any slab under heavy load.
- Cons: More labor-intensive to lay out and tie together. Requires more cutting.
The Golden Rule of Reinforcement Placement
This is the most common mistake DIYers make. Reinforcement does absolutely no good lying on the bottom of the slab. It must be positioned in the middle to upper-third of the slab’s thickness to be effective in tension.
- Use Chairs or Dobies: Place small plastic or concrete supports (called “chairs” or “dobies”) on top of your compacted gravel sub-base.
- Lay the Reinforcement: Lay your wire mesh or rebar grid on top of these chairs. For rebar, lay it out in a grid pattern (e.g., 18-24 inches on center) and tie the intersections together with rebar tie wire.
- The reinforcement should now be “floating” at the correct height within your forms, ready to be encapsulated by the concrete.
Part 4: The Main Event – Pour Day Choreography
The day has arrived. Your success now depends on efficiency, teamwork, and having the right tools at the ready.
The Pre-Flight Checklist
- Weather Check: The ideal temperature is between 50-80°F (10-27°C). Avoid pouring in the blistering heat, freezing cold, or if heavy rain is imminent.
- Assemble Your Crew: This is not a one-person job. You need at least 2-3 helpers: one to help direct the chute or wheelbarrow, one to spread, and one to start screeding.
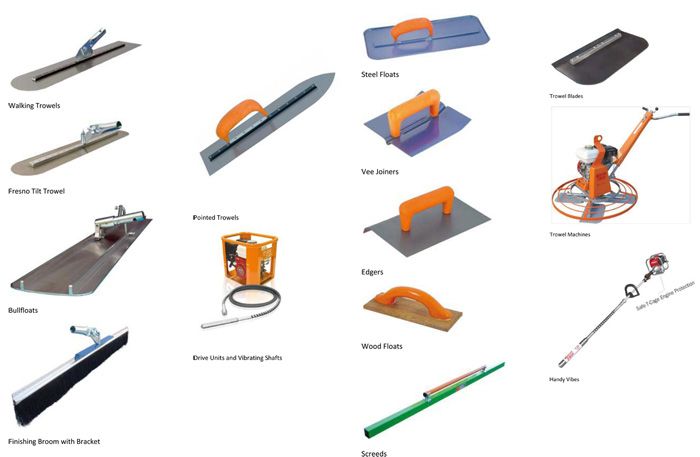
- Tool Muster: Have everything laid out and ready:
- Shovels and concrete rakes (come-alongs) for spreading.
- A screed board (a very straight 2×4, long enough to span your forms).
- A bull float with a long handle.
- A magnesium float (mag float).
- An edger tool.
- A groover (jointer).
- Wheelbarrows with air in the tires.
- Rubber boots and waterproof gloves for everyone.
- Safety glasses.
- Dampen the Sub-base: Lightly spray your gravel sub-base with a hose. This prevents the dry ground from sucking water out of the bottom of your concrete mix too quickly, which can weaken it. It should be damp, not puddled.
The Pour
- Direct the Truck: Guide the ready-mix truck into position. Communicate clearly with the driver.
- Start at the Far End: Begin placing concrete at the end or corner farthest from the truck. Work your way backward so you don’t have to walk or drag tools through the fresh concrete.
- Place, Don’t Dump: Have the driver release the concrete at a controlled rate. Don’t let it pile up in one giant mountain. Use your concrete rakes and shovels to pull it into position.
- Mind the Reinforcement: As you place the concrete, make sure to lift the wire mesh or rebar grid slightly with a rake to ensure it stays in the middle of the slab. Don’t let its weight push it to the bottom.
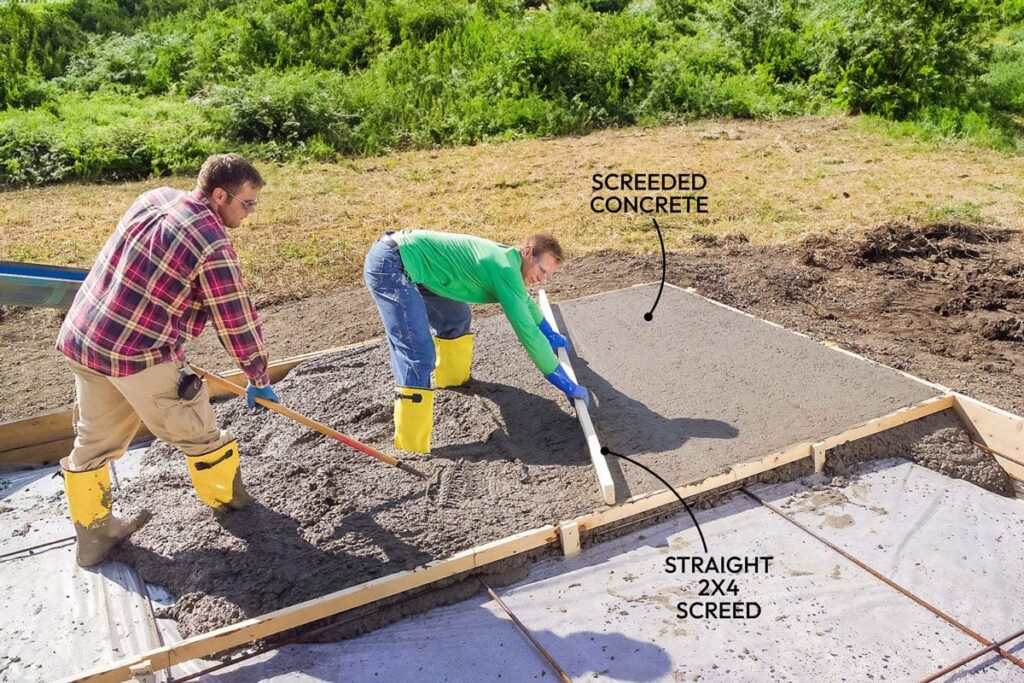
Spreading and Screeding – The First Act of Finishing
This step establishes the final height of your slab.
- Overfill Slightly: Spread the concrete so it’s slightly higher than the tops of your forms.
- Screed It: Place your screed board (the straight 2×4) across the top of your forms. With a helper on the other end, use a back-and-forth sawing motion as you slowly pull the board towards you. This will shave off the excess concrete and level the surface.
- Fill the Voids: You’ll see low spots behind the screed board. Shovel concrete into these voids and make a second screeding pass over the area. Repeat until the entire surface is flat and level with the tops of your forms.
Bull Floating – The Great Equalizer
Immediately after screeding, while the concrete is still very wet, you’ll use the bull float.
- Purpose: The large, flat head of the bull float smooths out the ridges left by screeding, pushes the larger aggregate (stones) just below the surface, and begins to bring the rich cement “cream” to the top.
- Technique: Push the float across the slab with the leading edge slightly tilted up. Then, pull it back with the opposite edge slightly tilted up. Overlap your passes. This takes a gentle touch; don’t dig in. Work your way across the entire slab.
Part 5: The Art of the Finish – Patience and Timing
This is where finesse and, most importantly, timing, come into play. After bull floating, you must wait. The concrete needs to firm up. All the excess water, known as “bleed water,” needs to rise to the surface and evaporate. The surface will go from a glossy wet look to a dull matte finish.
The Thumbprint Test: The concrete is ready for the next steps when you can press your thumb on it and leave only a slight indentation (about ¼ inch deep). If your fingers sink in or the surface is mushy, wait longer.
Step 1: Edging
Use an edger tool along the entire perimeter of the slab, between the concrete and the form boards. This compacts the edge and gives it a clean, rounded profile that is much more resistant to chipping. Run the tool back and forth until you have a smooth, defined edge.
Step 2: Grooving Control Joints
Concrete shrinks as it cures, and this shrinkage causes cracking. Control joints are pre-planned lines of weakness that encourage the concrete to crack in a straight, clean line where you want it to, rather than randomly across the surface.
- Placement: Joints should be spaced no more than 2-3 times (in feet) the slab’s thickness (in inches). For a 4-inch slab, joints should be every 8-12 feet.
- Technique: Place a straight board across the slab as a guide. Run your groover tool along the board, pressing down to create a joint that is at least one-quarter of the slab’s thickness. For a 4-inch slab, your groove should be 1 inch deep.
Step 3: Final Finishing
You have two main options for the final surface texture.
- Broom Finish (Recommended for Patios/Walkways): This creates a non-slip texture.
- Timing: After edging and grooving, let the concrete firm up just a little more.
- Technique: Gently drag a clean, stiff-bristled push broom across the surface. Do it in one continuous pull from one side to the other. Overlap each pass slightly. The texture should be consistent.
- Hard Trowel Finish (For Garage/Workshop Floors): This creates a very smooth, dense, and easy-to-clean surface.
- Timing: This is done after floating with the mag float.
- Technique: Use a steel finishing trowel. Hold it nearly flat for the first pass, sweeping in large arcs. With each subsequent pass, let the concrete harden more and increase the angle of the trowel. This process densifies the surface and makes it glass-smooth. It takes multiple passes and a lot of patience.
Part 6: The Sacred Cure – Protecting Your Masterpiece
You are not done yet. This is arguably the most critical and most often neglected step. Curing is not “drying.” It is a chemical reaction called hydration where the cement particles grow crystals that lock the whole matrix together. This reaction requires water. If the slab dries out too quickly, the reaction stops, and you will get a weak, dusty surface prone to cracking.
You must keep the slab continuously moist for at least 7 days.
- Method 1: Misting: On hot, dry days, gently mist the slab with a garden hose several times a day. Don’t use a powerful jet.
- Method 2: Covering: After the concrete is hard enough to walk on without marring, cover it with 6-mil plastic sheeting. Overlap the seams and weigh down the edges with lumber or rocks to trap the moisture. This is one of the best and easiest methods.
- Method 3: Curing Compound: You can buy a spray-on curing compound that forms a membrane over the surface to lock in moisture. This is a common professional method.
After the 7-day cure, you can remove the forms (use a pry bar carefully). The slab will continue to gain strength for weeks and even months, but it’s now ready for light use. Wait at least 28 days before driving a vehicle on it.
Conclusion: A Foundation for the Future
Stand back and look at what you’ve built. You took a patch of dirt and, through planning, force, and finesse, transformed it into a piece of engineered stone. This slab is a testament to your hard work and dedication. It is a solid, enduring foundation.
Every time you walk on it, park on it, or build on it, you’ll remember the feeling of the screed board shaving the surface smooth, the look of the cream rising under the float, and the deep satisfaction of creating something truly permanent. You didn’t just pour a slab; you built a foundation for a thousand future moments. And that is a job well done.