Essential Concrete Finishing Tools: Achieving a Professional Surface
Essential Concrete Finishing Tools: The difference between a “DIY-looking” slab and a professional-grade finish isn’t just the concrete mix—it’s the tools used during the critical window between the pour and the set. Finishing concrete is a race against time, and having the right arsenal of tools is the only way to win.
In this guide, we break down the essential finishing tools every concrete worker needs, from the initial “screeding” to the final “brooming.”
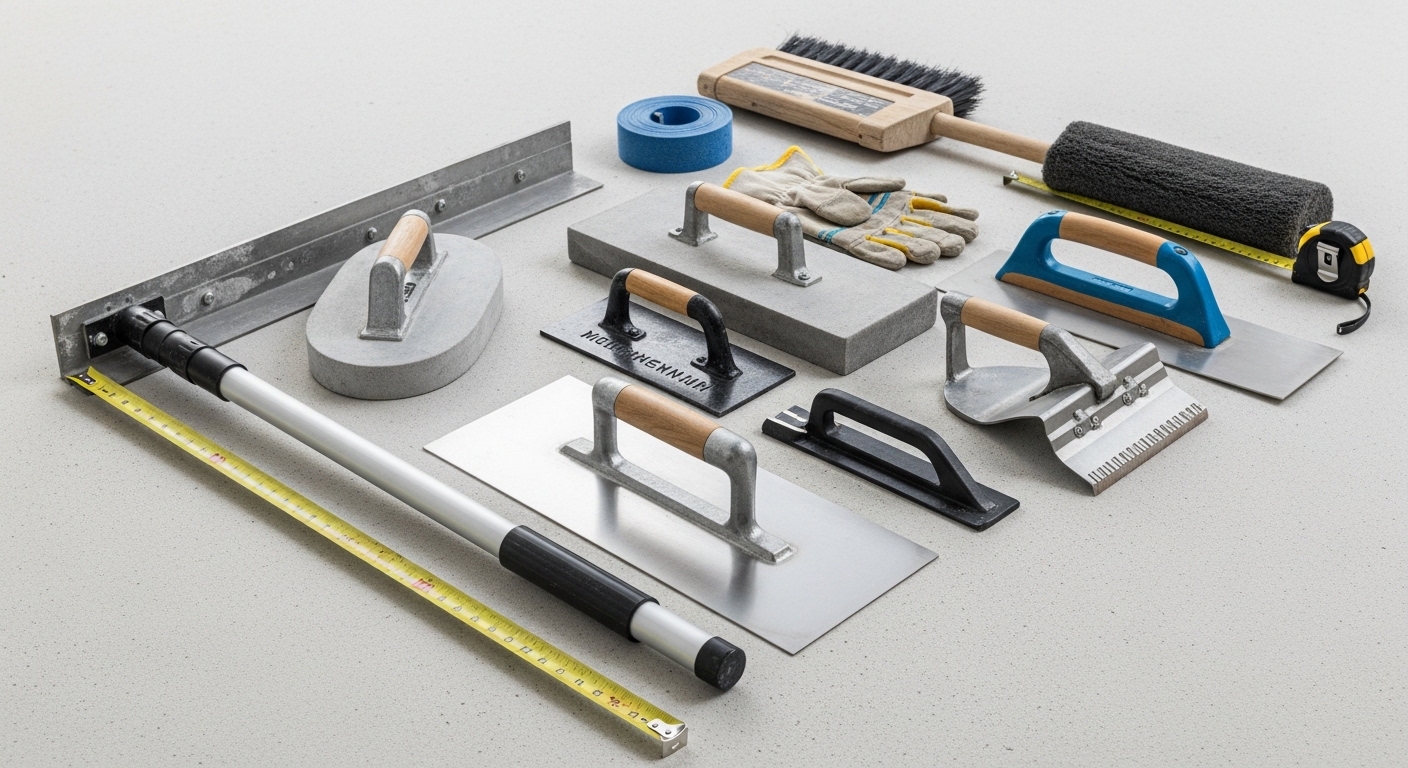
1. The Screed (Straightedge)
Before you can finish concrete, you must level it. The screed is a long, straight board (typically aluminum or a straight 2×4) used to strike off excess concrete.
- The Goal: To bring the concrete to the proper grade and remove high or low spots.
- Technique: Two workers pull the screed across the forms in a “sawing” motion. This is the most physically demanding part of the process.
2. The Bull Float
Once the concrete is leveled, the bull float is used to push down the large aggregate (rocks) and bring the “cream” (cement paste) to the surface.
- Design: A large, flat blade attached to a long, telescopic handle.
- When to use: Immediately after screeding, while the concrete is still very wet.
- Pro Tip: Twist the handle to lift the leading edge of the blade as you push and pull to avoid “digging in” to the wet surface.
3. Hand Floats: Magnesium vs. Wood
As the water begins to disappear (bleed water), it’s time for hand floating.
- Magnesium Float: The industry standard. It slides easily and opens up the “pores” of the concrete to allow trapped air and water to escape.
- Wood/Resin Float: Used for “grittier” mixes or when a rougher texture is needed for better bonding of toppings.
4. The Edger
An edger is a small tool with a curved lip used to create a rounded radius along the edge of the slab.
- Why it matters: Square edges are fragile and prone to chipping (spalling). A rounded edge is much more durable and looks aesthetically pleasing.
- When to use: After the bleed water has disappeared but before the concrete gets too stiff.
5. Groovers (Jointers)
Cracks are inevitable in concrete, but groovers allow you to control where they happen.
- The Function: By cutting “control joints” into the wet concrete, you create a weakened line. If the slab shrinks or shifts, it will crack at the bottom of the groove rather than across the middle of your beautiful slab.
- Rule of Thumb: Joints should be cut to a depth of at least 1/4 the thickness of the slab.
6. Steel Trowels
If you want a glass-smooth interior floor (like a warehouse or garage), you need a steel trowel.
- The Warning: Never use a steel trowel on exterior concrete. It seals the surface so tightly that air cannot escape, which can lead to “blistering” and scaling in cold climates.
- The Result: A hard, dense, and shiny finish that is easy to clean.
7. The Concrete Broom
For driveways, sidewalks, and patios, safety is the priority. A concrete broom is pulled across the surface to create a slip-resistant texture.
- The Timing: If you broom too early, the texture will be too deep and “shaggy.” If you broom too late, you won’t get any texture at all.

Summary Table: Which Tool When?
| Stage of Finishing | Tool Used | Purpose |
| Leveling | Screed | Remove excess concrete/level. |
| Initial Smoothing | Bull Float | Embed rocks/bring up cream. |
| Edging/Jointing | Edger & Groover | Prevent chipping/control cracks. |
| Final Smoothing | Steel Trowel | Create a hard, smooth finish. |
| Texturing | Broom | Provide slip resistance. |
Conclusion
A professional concrete finish is a combination of perfect timing and the correct tool. By investing in high-quality magnesium floats and ensuring your screed is perfectly straight, you can achieve results that look like they were done by a 20-year veteran.